How to Frame a Wall: The Complete Guide
Framing a wall is an essential part of building or renovating a space, whether it’s for a residential home, an office space, or a commercial property. Proper wall framing provides support for drywall, electrical wiring, and insulation while also ensuring that the structure is strong enough to handle load-bearing responsibilities.
In this complete guide, we’ll walk you through the step-by-step process of wall framing, including exterior walls, partition walls, and basement walls, while adhering to building codes and best practices.
By following these key steps, you’ll be able to create a sturdy and reliable wall frame that meets the requirements for both load-bearing and non-load-bearing walls. Let’s dive into the details!
What You’ll Need
Before starting your wall framing project, it’s essential to gather the necessary tools and materials. Here’s a list of what you’ll need:
Tools:
- Tape measure
- Speed Square
- Framing nailer or nail gun
- Power drill with special masonry drill bit
- Laser measure
- Concrete screws and masonry screws
- Concrete nailer (for concrete walls)
- Framing nails and finish nails
- Concrete screws or nails
- Concrete nail
- Pilot holes drill bit
- Hammer
- Saw to cut boards and studs to size
- Level for ensuring straight walls
Materials:
- 2×4 or 2×6 lumber (depending on wall type)
- Wood studs or steel studs
- Sole plate and top plate (treated lumber for concrete floors)
- Wall studs (2x4s or 2x6s)
- Drywall sheets
- Foam insulation or other layers of insulation
- Floor joists or concrete slab
- Trimmers for doors and windows
- Additional framing materials for load-bearing walls
- House wrap for exterior walls
- Nails, screws, and framing fasteners
Step-by-Step Guide to Framing a Wall
1. Measure and Mark the Layout
The first crucial step in framing a wall is measuring the area where the wall will be installed. Start by using a tape measure to determine the length and height of the entire wall. Be sure to consider the ceiling height and floor to ceiling distance to ensure your wall frame fits precisely.
Mark the center locations for your vertical wall studs, typically 16 or 24 inches on center, using a laser measure or tape measure. Mark the sole plate and top plate with edge marks to indicate the position of each wall stud.
For exterior walls or load-bearing walls, it’s essential to consult your local building codes and obtain a building permit to ensure your project is compliant. Be sure to also check if your wall will be adjacent to a basement wall or concrete wall, as this will affect your framing materials and method.
2. Cut the Lumber and Assemble the Frame
Using a saw, cut the sole plate and top plate to the appropriate length. These will be the horizontal boards that run along the floor and ceiling, forming the base and top of the wall frame.
Next, cut the vertical studs to size using your measurements. Wall studs are typically 8 or 9 feet tall, depending on the ceiling height. Position the studs between the sole plate and top plate at the marks you made earlier, ensuring they’re spaced correctly at 16 or 24 inches on center.
For load-bearing walls, include additional framing components such as trimmers for doors and windows. These will support the weight of the roof or ceiling joists above the wall. For non-load-bearing walls, such as partition walls in office space, standard framing techniques will suffice.
3. Install the Wall Frame
Once you’ve assembled the wall frame on the floor, it’s time to lift it into place. If you’re working on a basement wall or a wall adjacent to a concrete floor, ensure you use treated lumber for the sole plate to prevent moisture damage. Secure the sole plate to the concrete floor using concrete screws or a concrete nailer for a solid nailing surface.
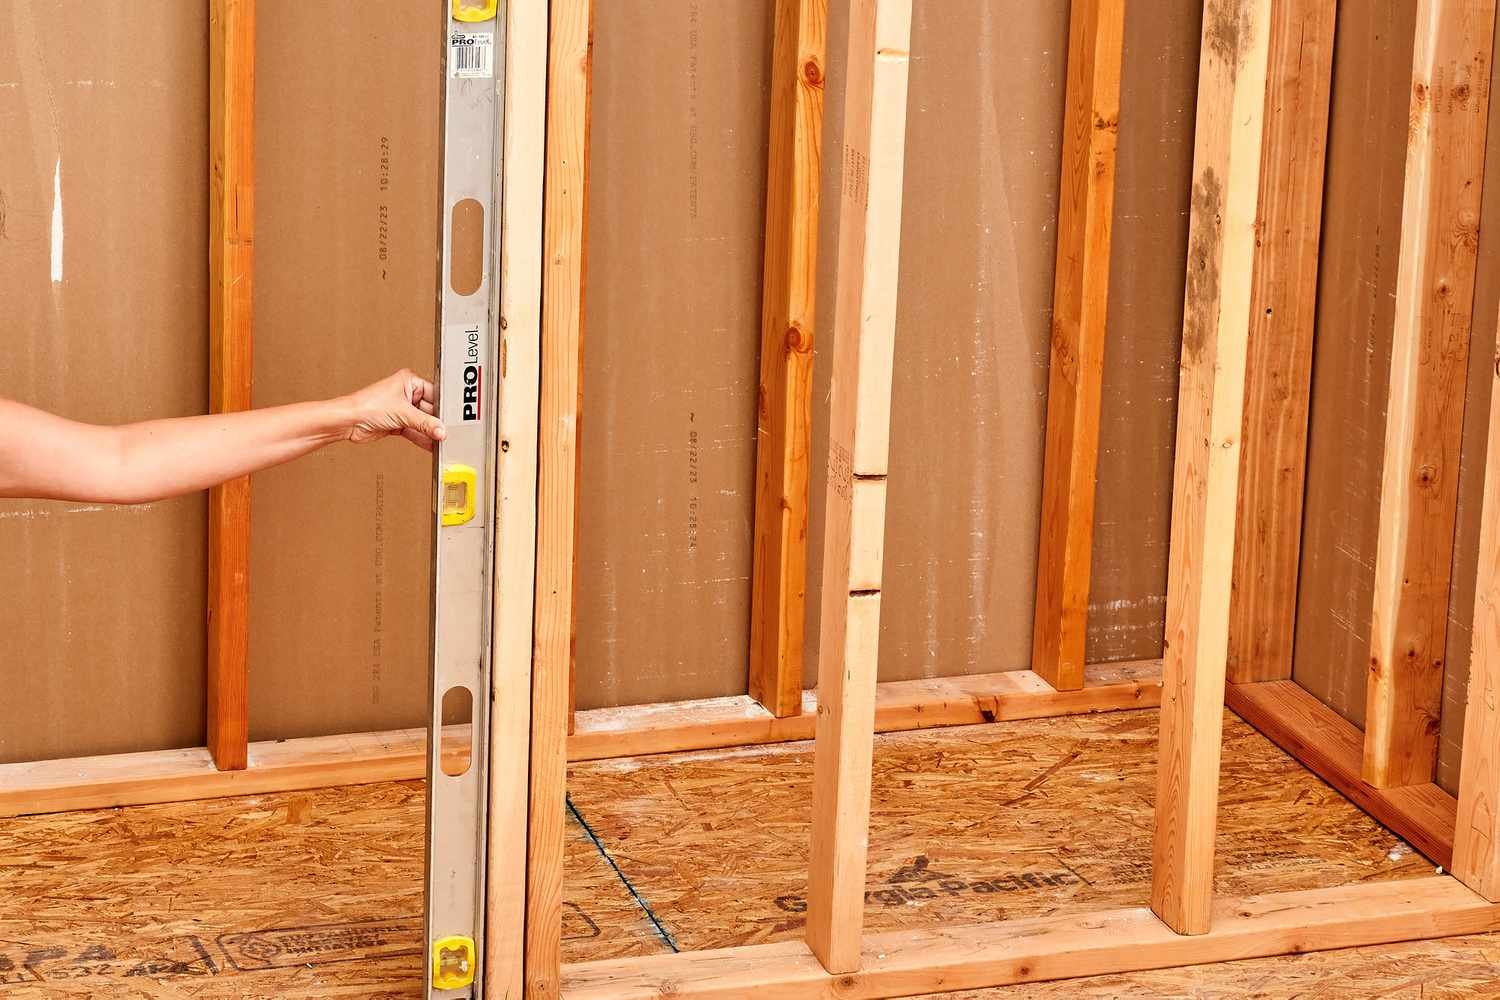
Ensure the wall frame is level and plumb before securing it to the ceiling plate or floor joists. For exterior walls, you may need to anchor the top plate to the ceiling joists or steel track for extra stability.
4. Attach the Studs
With the wall frame in position, drive framing nails through the top and sole plates into the ends of each wall stud. Use a framing nailer or hammer to secure the nails, ensuring each stud is properly aligned and spaced.
For load-bearing walls, it’s critical to ensure the vertical wall studs are straight and positioned correctly, as they will be supporting the weight of the roof or upper floor. In this case, a slight twist in the studs can compromise the entire wall’s strength, so take extra care during this step.
5. Add Additional Framing for Openings
If your wall includes openings for doors or windows, install additional framing around these areas. Use trimmers to support the rough opening height and width, ensuring that the frame is sturdy enough to hold the door or window in place.
For doors, install a pre-hung sliding door, patio doors, or even barn door hardware kit. Make sure the trim studs around the openings are flush with the rest of the wall frame, allowing for proper installation of door jambs and trim.
6. Check for Squareness
Before securing the frame permanently, use a Speed Square or a framing square to ensure the corners and edges of the frame are square. A square frame is crucial for proper drywall installation and alignment with adjoining corner walls.
7. Secure the Frame
After confirming the frame is square, secure the frame to the floor and ceiling using framing nails or screws. For concrete walls, use concrete screws or nails to attach the sole plate to the floor. Be sure to drive nails into each stud location to keep the frame secure.
8. Install Drywall Backers
Drywall backers are additional framing pieces installed between studs to provide extra support for drywall sheets. This is especially important for corners or areas where drywall damage is more likely to occur, such as adjoining corner walls or non-load-bearing partition walls.
9. Install Drywall Sheets
Once the frame is complete, it’s time to install the drywall sheets. Use a power drill and drywall screws to attach the drywall to the wall studs, ensuring that each screw is driven into the center mark of each stud for a secure hold.
When cutting drywall sheets to size, ensure a gap between the wall and the floor to allow for expansion. Be sure to drive nails or screws into the drywall backers to prevent movement or gaps.
10. Finish the Wall
Finally, finish the wall by filling in nail holes with joint compound, sanding the surface smooth, and applying any necessary surface treatments such as paint or wallpaper.
For exterior walls, add house wrap or layers of insulation to protect against moisture and improve energy efficiency. Be sure to seal all gaps between the wall frame and the foundation walls, floors, or ceilings with foam insulation.
Pro Tips for Wall Framing
- Always check local building codes before beginning a wall framing project, especially for exterior walls or load-bearing walls.
- For concrete floors, use treated lumber for the sole plate to prevent moisture damage.
- Use a framing nailer or nail gun to save time and improve accuracy.
- When framing basement walls, be mindful of moisture and consider using foam insulation for added protection.
- Ensure your walls are square and plumb by using a Speed Square or laser level during installation.
Contact us today
Framing a wall is a crucial step in the construction process, whether you’re working on a simple partition wall or a more complex load-bearing structure. At LV Design & Build, we specialize in home remodels, custom framing, and expert wall construction. Whether you need assistance with residential framing or are planning a major renovation, our team is here to help.
Contact us today for a free consultation and let’s discuss how we can bring your project to life with precision and expertise!
FAQ on How To Frame A Wall
How do I measure and mark stud locations for wall framing?
To measure and mark stud locations for wall framing, use a tape measure and mark the sole plate and top plate at intervals of 16 or 24 inches on center. Use a laser measure or Speed Square to ensure accuracy. Mark the center locations of each vertical wall stud, as this will guide you in positioning the wall studs when assembling the frame.
What is the difference between load-bearing and non-load-bearing walls?
A load-bearing wall supports the weight of the structure above it, such as ceiling joists or a second floor, while a non-load-bearing wall simply divides spaces without carrying structural weight. It’s crucial to understand the function of your wall before starting the framing process, as load-bearing walls require additional framing and must adhere to stricter building codes.
How do I secure a sole plate to a concrete floor?
When securing a sole plate to a concrete floor, you should use concrete screws or a concrete nailer. First, drill pilot holes with a special masonry drill bit, then insert concrete nails or screws for a strong, secure hold. This ensures that your wall frame is stable and anchored properly to the concrete slab or concrete floors.
What framing materials should I use for an exterior wall?
For an exterior wall, you’ll need pressure-treated lumber for the sole plate to prevent moisture damage. Additionally, use wood studs or steel studs for the vertical framing. Don’t forget to include house wrap and layers of insulation to protect against weather elements. For securing the wall, use framing nails and make sure the wall complies with local building codes.
How do I account for doors and windows in a wall frame?
When framing for doors and windows, it’s essential to include trimmers and additional framing around the rough opening height. This ensures the wall can support the trim studs and weight around the opening. For doors, you may need to install a pre-hung sliding door, patio doors, or barn door hardware kit, depending on your design needs.
How can I ensure my wall frame is square?
To ensure your wall frame is square, use a Speed Square or a laser measure to check that the corners and edges are at a 90-degree angle. Having a square frame is crucial for proper drywall installation and alignment with adjoining walls. Double-check your measurements and use a level to make sure the frame is also plumb.
How do I attach drywall sheets to a wall frame?
To attach drywall sheets to a wall frame, use a power drill and drywall screws. Secure the drywall to the center mark of each wall stud for a solid hold. When cutting drywall sheets to size, leave a gap between the wall and floor for expansion, and ensure to drive screws into the drywall backers to prevent any shifting.
How do I install framing on a basement wall?
Framing a basement wall requires attention to moisture prevention. Use treated lumber for the sole plate, and secure it to the concrete floors with concrete screws. Add foam insulation or other moisture barriers to protect the frame. Be sure to check for compliance with building codes, especially for load-bearing basement walls.
What tools do I need for basic wall framing?
For basic wall framing, you’ll need several tools including a tape measure, Speed Square, framing nailer or nail gun, laser measure, and a power drill. Depending on your project, you may also need a concrete nailer for attaching frames to concrete walls and a saw for cutting studs and plates to the right size.
What should I consider when framing around electrical wiring?
When framing around electrical wiring, make sure to leave enough space between the vertical wall studs to allow for proper installation. It’s important to consult with a licensed electrician to ensure the wiring is up to code and that the wall will have sufficient support. Pilot holes can be drilled to run wiring through studs without weakening the wall frame.
How can I frame a partition wall in an office space?
Framing a partition wall in an office space follows the same general principles as framing other types of walls. Measure the wall height and mark the stud locations at 16 or 24 inches on center. Assemble the frame using vertical studs, sole plates, and top plates, securing them with framing nails. If your office space has drop ceilings, make sure to account for the ceiling grid when securing the top of the wall frame.
What kind of screws and nails should I use for wall framing?
For wall framing, use framing nails or nail gun fasteners to secure the frame’s studs and plates. For attaching the frame to concrete floors or foundation walls, use concrete screws. Drywall sheets should be secured with drywall screws. Always use the appropriate fasteners for the surface you’re working with to ensure a solid nailing surface.
Can I frame a wall against a brick wall?
Yes, you can frame a wall against a brick wall by securing the sole plate to the floor and using concrete screws to attach the frame to the brick. Be sure to leave a small gap between the wall frame and the brick for any expansion. Add insulation if needed, and make sure the frame is level before securing it.
How do I ensure compliance with building codes?
Always check local building codes before starting any wall framing project. This is especially important for load-bearing walls and exterior walls. Depending on the project, you may need a building permit, so it’s essential to verify the requirements in your area. Complying with codes ensures the safety and durability of your structure.
How do I fix drywall damage after framing?
If there’s drywall damage after framing, repair it by filling the affected area with joint compound and smoothing it out with a putty knife. After the compound dries, sand the area to achieve a smooth finish. For corners for drywall, install drywall backers to prevent future damage and ensure that the drywall sheets remain secure.
What is a sole plate and why is it important?
A sole plate is the horizontal board at the base of a wall frame that runs along the floor. It’s crucial for anchoring the vertical studs and providing a foundation for the entire wall. In cases where the wall is installed on a concrete floor slab, the sole plate should be treated lumber to prevent moisture damage.
What should I do if I encounter an odd space while framing?
For odd spaces, you may need to cut your studs or boards to size using a saw to fit the area. For spaces between vertical wall studs, you can add additional framing or use drywall backers to secure the drywall sheets. Always ensure that the frame remains square and plumb, even in unusual spaces.